As a part of End to End REST Assured Tutorial , in this post we will learn to setup a Maven – REST Assured in Eclipse IDE.
Maven is a build automation tool for Java Projects primarily. If you have worked on Selenium projects, you must have used Maven. The major use of Maven we understand to manage dependency of JAR files. Let’s continue the same understanding for REST Assured project as well. We will discuss the power of Maven tool later separately .
Let’s setup a REST Assured project step by step:-
- Create a Maven Java Project.
- Add Maven dependency of REST Assured in pom.xml
- Add Maven dependency of TestNG/JUNIT in pom.xml ( Required to manage and run tests effectively)
- Add Maven dependency of JSON Schema Validator in pom.xml ( Needed for JSON schema validator)
- Add Maven dependency of Jackson JSON Java parser ( Needed for mapping Java objects to and from JSON )
- Add Maven dependency of JAXB XML Java parser ( Needed for
mapping Java objects to and from XML )
Later we can add other required dependencies for Reporting, Logging, Excel reader as we required. We do not need as of now so I do not want to confuse you as well. Even as of now you can skip Step 4, 5 and 6 as well. I will also suggest you to always add latest version of jar files.
Hope you are aware to create a maven project in Eclipse. If not follow step by step here:-
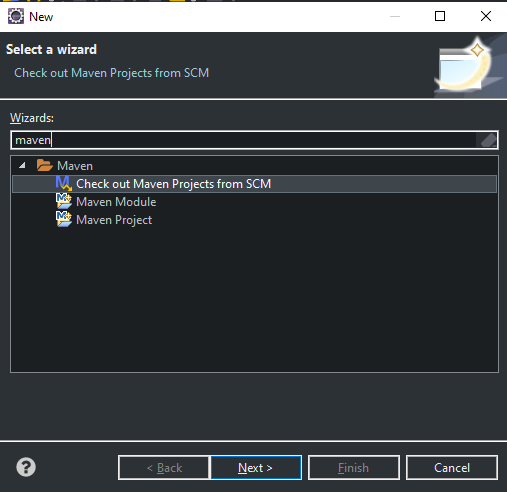
- Navigate to File -> New -> Other. Type “maven” in Wizard text box:-
2. Select “Maven Project” and click on Next. Check “Create a simple project (skip archetype selection) ” checkbox. Leave remaining fields as it is. You can customize other fields if you understand them. Click on Next.

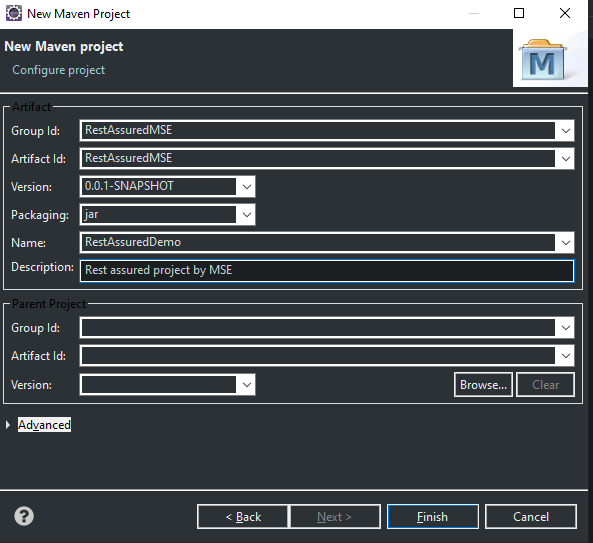
3. Give some name in to “Group id” and “Artifact id”. You can also give values to Name and Description fields. Click on Finish button.
4. You should see a Java project with name equal to Artifact id value is created in Package Explorer.

5. Now open pom.xml file and start adding dependencies. Please note there will be no <dependencies> tag in pom.xml so you need to add explicitly.

Navigate to Maven Central website and search for required dependencies and add them.
To find latest version of required jars, below are direct links:-
REST Assured TestNG JSON Schema Validator Jackson Java Parser JAXB
My pom.xml as of writing this post: –
	4.0.0
	RestAssuredMSE
	RestAssuredMSE
	0.0.1-SNAPSHOT
	RestAssuredDemo
	Rest assured project by MSE


			io.rest-assured
			rest-assured
			4.1.2
			test


			org.testng
			testng
			7.0.0
			test


			io.rest-assured
			json-schema-validator
			4.1.2


			com.fasterxml.jackson.core
			jackson-databind
			2.10.0


			javax.xml.bind
			jaxb-api
			2.3.1
Now save the project, you will see workspace will be built i.e. maven will download all dependencies defined in pom.xml above.
Some important points:-
- You no need to add dependency of JSONPath and XMLPath explicitly. RestAssured includes both by default. You can see in Maven Dependencies folder under your project.

2. You no need to add Jackson Core and Annotation dependencies explicitly as Jackson Databind will download them as transitive dependencies.

If you have any doubt, feel free to comment below.
If you like my posts, please like, comment, share and subscribe.
#ThanksForReading
#HappyLearning
You can find all Selenium related post here.
You can find all API manual and automation related posts here.
You can find frequently asked Java Programs here.
Is that possible to integrate rest assured API with my selenium project ?
for those who are using intellij instead of eclipse , restart the IDE and it will download all dependencies , firstly it can give error
good information..how to clarify our doubts
Good one