
Cucumber Tutorial 1 – Setup a Basic Maven-Cucumber 5 -Junit Project in Eclipse
*****Updated with latest version of Cucumber 5 *********
Cucumber 6 is on the way but many are still using Cucumber 1 ( info.cukes version). So in this post, I am going to explain An end to end basic Cucumber 5 maven project setup with Junit in Eclipse.
Step 1:- Setup Eclipse
Eclipse is an integrated development environment which can be used to develop Java programs. I am not going to explain installation of Eclipse in this post. It is very straight forward and little google can help you much better. If you have any difficulty in installation , feel free to contact me though mail.
We need two plugins for Eclipse in order to work with Cucumber projects:-
Natural plugin is helpful in editing and maintaining BDD/ATDD files. The currently supported languages are Cucumber (Gherkin syntax) and JBehave.
Cucumber Eclipse Plugin is helpful as content assistance for feature file , syntax highlighting, pretty formatting and step definition wizard.
To install above plugins, go to Eclipse Marketplace (Help -> Eclipse Marketplace) . Now search both plugins one by one and click “Install” button. Plugin installation requires restart of Eclipse. I will suggest you to install both plugins one by one and restart eclipse.
Step 2 :- Create a Maven project and add required dependencies
You just need two dependencies for Cucumber-Junit project”:-
Note:- Keep version of Cucumber-Java and Cucumber-Junit same.
I believe creating a maven project in Eclipse will not be tough job for you. If you face any problem, refer this post.
Add above dependencies ( For this post, I am using Cucumber 4) in your pom.xml. Your pom.xml should look like as below:-
	4.0.0
	MavenCucumber5JunitSampleProject
	MavenCucumber5JunitSampleProject
	0.0.1-SNAPSHOT


		UTF-8
		1.8
		1.8


			io.cucumber
			cucumber-java
			5.6.0


			io.cucumber
			cucumber-junit
			5.6.0
			test
You could see an extra <properties> tag in above example. That is to set Java version as 1.8 for this project. By default you see 1.5 Java version when you create a new maven project.
Step 3:- Create a feature file
Now create a simple feature file “src/test/resources“. A feature file has a file extension as “.feature“. This feature file contains acceptance scenarios in Gherkin language.

I have created a very simple feature file as below:-
Feature: This is a demo feature one

Scenario: This is first scenario
    Given Precondition is given
    When Something is done
    Then Something is expected


    Scenario: This is second scenario
    Given Another precondition is given
    When Something is done again
    Then Something is expected again
Step 4:- Generate Step definition
Right click on above feature file and Select “Run As – > Cucumber Feature”. It will generate step definitions of above steps. You will get output in console as below:-
Jan 13, 2020 1:07:59 PM cucumber.api.cli.Main run
WARNING: You are using deprecated Main class. Please use io.cucumber.core.cli.Main
Feature: This is a demo feature one

  Scenario: This is first scenario # /C:/Users/amomahaj/eclipse-workspace/MavenCucumber4JunitSampleProject/src/test/resources/featureFiles/DemoFeature.feature:3
    Given Precondition is given    # null
    When Something is done         # null
    Then Something is expected     # null

  Scenario: This is second scenario     # /C:/Users/amomahaj/eclipse-workspace/MavenCucumber4JunitSampleProject/src/test/resources/featureFiles/DemoFeature.feature:9
    Given Another precondition is given # null
    When Something is done again        # null
    Then Something is expected again    # null

Undefined scenarios:
/C:/Users/amomahaj/eclipse-workspace/MavenCucumber4JunitSampleProject/src/test/resources/featureFiles/DemoFeature.feature:3 # This is first scenario
/C:/Users/amomahaj/eclipse-workspace/MavenCucumber4JunitSampleProject/src/test/resources/featureFiles/DemoFeature.feature:9 # This is second scenario

2 Scenarios (2 undefined)
6 Steps (6 undefined)
0m0.387s


You can implement missing steps with the snippets below:

@Given("Precondition is given")
public void precondition_is_given() {
    // Write code here that turns the phrase above into concrete actions
    throw new cucumber.api.PendingException();
}

@When("Something is done")
public void something_is_done() {
    // Write code here that turns the phrase above into concrete actions
    throw new cucumber.api.PendingException();
}

@Then("Something is expected")
public void something_is_expected() {
    // Write code here that turns the phrase above into concrete actions
    throw new cucumber.api.PendingException();
}

@Given("Another precondition is given")
public void another_precondition_is_given() {
    // Write code here that turns the phrase above into concrete actions
    throw new cucumber.api.PendingException();
}

@When("Something is done again")
public void something_is_done_again() {
    // Write code here that turns the phrase above into concrete actions
    throw new cucumber.api.PendingException();
}

@Then("Something is expected again")
public void something_is_expected_again() {
    // Write code here that turns the phrase above into concrete actions
    throw new cucumber.api.PendingException();
}
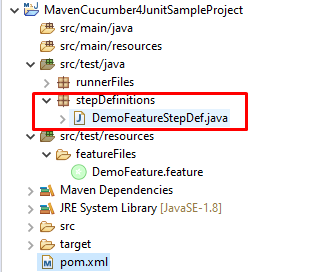
You see a line in above output as “You can implement missing steps with the snippets below:“. Copy everything after that line and paste in to Java class. Create a package say “stepDefintions” under “src/test/java” and create a Java class say “DemoFeatureStepDef.java“. Paste generated step definition in this class.
Since we need to provide our own definition to step, I added a normal print statement in each step definition methods as below:-
package stepDefinitions;

import io.cucumber.java.en.Given;
import io.cucumber.java.en.Then;
import io.cucumber.java.en.When;

public class DemoFeatureStepDef {


	@Given("Precondition is given")
	public void precondition_is_given() {
	   System.out.println("Precondition is given");
	}

	@When("Something is done")
	public void something_is_done() {
	    System.out.println("Something is done");
	}

	@Then("Something is expected")
	public void something_is_expected() {
	    System.out.println("Something is expected");
	}

	@Given("Another precondition is given")
	public void another_precondition_is_given() {
	   System.out.println("Another precondition is given");
	}

	@When("Something is done again")
	public void something_is_done_again() {
	    System.out.println("Something is done again");
	}

	@Then("Something is expected again")
	public void something_is_expected_again() {
	    System.out.println("Something is expected again");
	}


}
Step 5:- Run Feature file
Now you are all set to run your test. Remember you need to run feature file not step definition file. You don’t need runner file as well. In fact, you don’t even require Junit as of now. Just right click on feature file and select “Run As – > Cucumber Feature“. You will see output as below:-
Jan 13, 2020 1:20:39 PM cucumber.api.cli.Main run
WARNING: You are using deprecated Main class. Please use io.cucumber.core.cli.Main
Feature: This is a demo feature one

  Scenario: This is first scenario # /C:/Users/amomahaj/eclipse-workspace/MavenCucumber4JunitSampleProject/src/test/resources/featureFiles/DemoFeature.feature:3
Precondition is given sdffdsfsf
    Given Precondition is given    # DemoFeatureStepDef.precondition_is_given()
Something is done
    When Something is done         # DemoFeatureStepDef.something_is_done()
Something is expected
    Then Something is expected     # DemoFeatureStepDef.something_is_expected()

  Scenario: This is second scenario     # /C:/Users/amomahaj/eclipse-workspace/MavenCucumber4JunitSampleProject/src/test/resources/featureFiles/DemoFeature.feature:9
Another precondition is given
    Given Another precondition is given # DemoFeatureStepDef.another_precondition_is_given()
Something is done again
    When Something is done again        # DemoFeatureStepDef.something_is_done_again()
Something is expected again
    Then Something is expected again    # DemoFeatureStepDef.something_is_expected_again()

2 Scenarios (2 passed)
6 Steps (6 passed)
0m0.192s
Step 6:- Run Feature file using Runner class
Runner class is useful to run multiple feature files and you can do a lot of configurations. We will see those in upcoming post. As of now we are covering only a basic setup.
Create a package named say “runnerFiles” under “src/test/java“. Create a runner java class now as “RunJunitTest.java“. You must create runner class name ending with word “Test” so that it can picked automatically while running through maven.
Content of Runner file will be as below:-
package runnerFiles;

import org.junit.runner.RunWith;

import io.cucumber.junit.Cucumber;
import io.cucumber.junit.CucumberOptions;


@RunWith(Cucumber.class)
@CucumberOptions(features = "src/test/resources/featureFiles",
glue = "stepDefinitions")
public class RunJunitTest {
}
Annotation @RunWith is used to run as Junit using Cucumber. If you use serenity BDD, there you need to mention “SerenityRunner.class“. In @CucumberOptions annotation, feature attribute is used to pass path of feature file and glue attribute is to give path of step definitions. There are many if and but with this but stick to it as of now.
Now run above runner file as “Run As – > JUnit Test“. You should output as below:-
Precondition is given
Something is done
Something is expected
Another precondition is given
Something is done again
Something is expected again
Step 7:- Run Feature file using maven commands
Right click on Project or pom.xml and select Run As -> Maven test. It will pick Runner class ending with “Test” and execute feature file during test phase of maven life cycle. You will see output contains:-
Running runnerFiles.RunJunitTest
Precondition is given
Something is done
Something is expected
Another precondition is given
Something is done again
Something is expected again
Tests run: 2, Failures: 0, Errors: 0, Skipped: 0, Time elapsed: 0.363 sec

Results :

Tests run: 2, Failures: 0, Errors: 0, Skipped: 0
You can clone sample project from here.
If you have any doubt, feel free to comment below.
If you like my posts, please like, comment, share and subscribe.
#ThanksForReading
#HappyLearning
You can find all Selenium related post here.
You can find all API manual and automation related posts here.
You can find frequently asked Java Programs here.
Hi,
After adding dependencies and running feature file getting this error
Sep 22, 2022 11:32:43 AM cucumber.api.cli.Main run
WARNING: You are using deprecated Main class. Please use io.cucumber.core.cli.Main
Sep 22, 2022 11:32:43 AM io.cucumber.core.runtime.FeaturePathFeatureSupplier get
WARNING: No features found at file:/C:/Users/REENA/Desktop/Eclipse/OCEtest/src/test/resources/Features/oce.Feature
0 Scenarios
0 Steps
0m0.068s
?????????????????????????????????????????????????????????????????????????????????????
? Share your Cucumber Report with your team at https://reports.cucumber.io ?
? Activate publishing with one of the following: ?
? ?
? src/test/resources/cucumber.properties: cucumber.publish.enabled=true ?
? src/test/resources/junit-platform.properties: cucumber.publish.enabled=true ?
? Environment variable: CUCUMBER_PUBLISH_ENABLED=true ?
? JUnit: @CucumberOptions(publish = true) ?
? ?
? More information at https://cucumber.io/docs/cucumber/environment-variables/ ?
? ?
? Disable this message with one of the following: ?
? ?
? src/test/resources/cucumber.properties: cucumber.publish.quiet=true ?
? src/test/resources/junit-platform.properties: cucumber.publish.quiet=true ?
?????????????????????????????????????????????????????????????????????????????????????
below is my pom.xml
4.0.0
OCEtest
OCEtest
0.0.1-SNAPSHOT
io.cucumber
cucumber-java
7.7.0
io.cucumber
cucumber-core
7.7.0
If anyone have solution please help me. Its urgent
Thanks in advance
How can we run cucumber Junit tests with crossbrowser at a time?
Why getting below error while trying to run junit runner class with testng xml.
Using runner its working but not with testng xml.
un 11, 2020 6:00:31 PM io.cucumber.testng.TestNGCucumberRunner
WARNING: By default Cucumber is running in –non-strict mode.
This default will change to –strict and –non-strict will be removed.
You can use –strict or @CucumberOptions(strict = true) to suppress this warning
Jun 11, 2020 6:00:31 PM io.cucumber.core.runtime.FeaturePathFeatureSupplier get
WARNING: No features found at classpath:/makroRunner
0 Scenarios
0 Steps
0m0.010s
Runner class:
@CucumberOptions(
features=”src/test/resources/features”,
plugin = {“pretty”,”html:target/cucumber”,”json:target/cucumber/cucumber.json”,”com.aventstack.extentreports.cucumber.adapter.ExtentCucumberAdapter:”},
glue=”makroStepDefinations”,
monochrome = true,
tags= {“@signIn”},
strict = true
)
public class RunnerTest extends AbstractTestNGCucumberTests {
@Override
@DataProvider(parallel = true)
public Object[][] scenarios() {
return super.scenarios();
}
Very Productive Stuff.
If I want to maintain all my feature file in Excel and and run my feature with Yes or No basis and all respective test data for each feature how can we do.