
REST Assured Tutorial 13 – How to write API Response in a JSON File
Introduction
As a part of the End to End REST Assured Tutorial, in this post, We will learn to write API response to a JSON file in Rest Assured.
We may require to store API JSON responses in to JSON files for future reference as a test result. It may also required to pass stored JSON response as an input to another APIs. We can also store JSON response to extract values in future.
Required Dependecies
I have used Rest Assured and TestNG dependecies here. TestNG dependecies we requires to use “Files” class from Google Common dependecies. TestNG dependecy has transitive dependecies of Guava. So here TestNG can be used for both as Test framework and File handling utils.
    io.rest-assured
    rest-assured
    4.3.3
    test
    org.testng
    testng
    7.3.0
    test
Writing response into a JSON file
Rest Assured provides below methods to get a response as:-
- As byte array :- asByteArray()
- As input stream :- asInputStream()
- As string :- asString()
All the above methods output can be used to write into a JSON file.
Example program
package RestfulBooker.extractResponse;

import java.io.File;
import java.io.IOException;
import java.io.InputStream;
import com.google.common.io.Files;

import io.restassured.RestAssured;
import io.restassured.http.ContentType;
import io.restassured.response.Response;
import io.restassured.specification.RequestSpecification;

public class WriteResponseInTextFile {

	public static void main(String[] args) throws IOException {

		// There is no need to add escape character manually. Just paste string within
		// double
		// quotes. It will automatically add escape sequence as required.
		String jsonString = "{\"username\" : \"admin\",\"password\" : \"password123\"}";

		// Create a request specification
		RequestSpecification request = RestAssured.given();

		// Setting content type to specify format in which request payload will be sent.
		// ContentType is an ENUM.
		request.contentType(ContentType.JSON);
		// Adding URI
		request.baseUri("https://restful-booker.herokuapp.com/auth");
		// Adding body as string
		request.body(jsonString);

		// Calling POST method on URI. After hitting we get Response
		Response response = request.post();

		// Getting response as a string and writing in to a file
		String responseAsString = response.asString();
		// Converting in to byte array before writing
		byte[] responseAsStringByte = responseAsString.getBytes();
		// Creating a target file
		File targetFileForString = new File("src/main/resources/targetFileForString.json");
		// Writing into files
		Files.write(responseAsStringByte, targetFileForString);

		// Getting response as input stream and writing in to a file
		InputStream responseAsInputStream = response.asInputStream();
		// Creating a byte array with number of bytes of input stream (available()
		// method)
		byte[] responseAsInputStreamByte = new byte[responseAsInputStream.available()];
		// Reads number of bytes from the input stream and stores them into the byte
		// array responseAsInputStreamByte.
		responseAsInputStream.read(responseAsInputStreamByte);
		// Creating a target file
		File targetFileForInputStream = new File("src/main/resources/targetFileForInputStream.json");
		// Writing into files
		Files.write(responseAsInputStreamByte, targetFileForInputStream);

		// Directly getting a byte array
		byte[] responseAsByteArray = response.asByteArray();
		// Creating a target file
		File targetFileForByteArray = new File("src/main/resources/targetFileForByteArray.json");
		// Writing into files
		Files.write(responseAsByteArray, targetFileForByteArray);

	}

}
Output
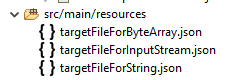
Refresh the project folder if you are using Eclipse. You should see three files as below:-
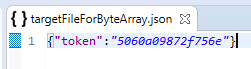
Open a file you should see it has stored response as below:-
You may be thinking about which way is more optimal if you want to write into a file. If you notice that we get a response as String or inputStream, we just need to convert them to Byte array before writing into a file. In the third way, we are directly getting Byte Array. Hence the third way is more optimal.
You can download/clone the above sample project from here.
You can subscribe to my YouTube channel RetargetCommon to learn from video tutorials.
If you have any doubt, feel free to comment below.
If you like my posts, please like, comment, share and subscribe.
#ThanksForReading
#HappyLearning
Find all Selenium related posts here, all API manual and automation related posts here, and find frequently asked Java Programs here.
Many other topics you can navigate through the menu.
Amod thanks so much for this! These tutorials are bringing me up to speed very quickly!
It could have been better, if you have provided example to append the text at the end of text file. Files.write() method just overwrites the existing content.
That will be more of a file handling concept. I Will post on that.
Just to mention: We need to have “json-schema-validator” dependency in order to access Files.write() method from “com.google.common.io” package. Otherwise, we need to add “guava” dependency explicitly.
Yes, that is correct that to use “Files” from Google Common we need “guava” dependency. Since I have TestNG in my project pom.xml and “guava” is a transitive dependency of TestNG.
This is the best thing about your tutorial, you tell concepts like books that too in a noticeably short and precise manner.
Thanks, keep up the excellent work. Will use asByteArray always
Thanks, Gaurav.